
#1 Travel Light
First rule of traveling is to always travel as light as possible. You don’t want to be lugging around heavy bags of camera equipment when you’re on the go, so make sure to only pack the necessities. Whilst it would be fantastic to take all of your equipment abroad practicalities such as baggage allowance and insurance costs could mean you are better of hiring equipment on arrival or opting for lesser items.
Ideally if you choose to take your own kit you’ll need to travel light: one body (unless you have the room for a spare), memory cards, portable storage unit, a flash unit, a selection of lenses, back-up batteries, and a durable camera bag that distributes the weight evenly over your shoulders and protects against heat, cold, sand and moisture.
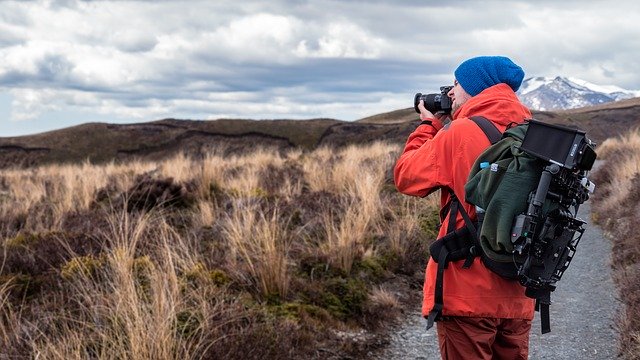
If for some reason you do need a ton of camera equipment (maybe you’re shooting video in addition to your traditional still shots?), opt for a comfortable carrying case/backpack that will make it easier on your body.
#2 Pack a Lightweight Travel Tripod
A tripod is one of the best camera accessories you can have, and really essential for travel photography. A tripod allows you to set your camera position and keep it there. With the camera fixed, you can then take your time arranging the perfect composition.
You can also adjust exposure settings, focus points, and really spend time paying attention to the image you want to create. Or use advanced techniques like HDR, focus stacking, and panoramas.
Tripods give you the ability to shoot much slower shutter speeds (waterfalls, low-light, stars, etc.) without worrying about hand-held camera shake. You can keep your ISO low (for less sensor noise) and use smaller apertures, so more of the image is in focus.
Another good thing about using a tripod is that it will force you to slow down with your travel photography and put more thought into each shot. Rather than just pointing and shooting, you will think carefully about where you want to set up your tripod and how you want to compose your shot.
#3 Choose the Right Lenses
Travel opens up a wide scope of genres for the avid photographer to explore, but picking which lenses to take will ultimately help or hinder you in the field. If you only have the room or budget to select one glass, opt for a fast and versatile zoom such as an 18-200mm or 28-300m etc.
Sometimes you’ll find the focal point far off in the distance, but other times it could be right under your nose, as such a variable focal length lens that starts with a healthy wide angle and follows through to telephoto is ideal.
If you have extra room or would prefer a wider choice consider: a portrait prime lens (e.g. 50mm or 85mm), a wide angle lens (e.g. 10-24mm) and a telephoto (e.g. 70-200mm).
#4 Use Manual Mode
You’d think that modern cameras are smart enough to take incredible pictures on their own, in AUTO mode. Well, that’s just not the case. While they do a pretty good job, if you want truly stunning images, you need to learn how to manually control your camera’s settings yourself.
Knowing your camera inside and out and understanding manual mode will really improve your skills as a photographer immensely. You can do a lot in automatic mode, but if you want to get better as a photographer, the only way to learn is by using manual settings.
It will take months of practice, but eventually you’ll be able to look at a scene and instantly know what aperture, ISO and shutter speed to use to get the exact style of image you’re looking for.
You can also use aperture priority mode (the letter A on your camera) if you don’t want to make the big leap to manual just yet.
This way you can lock in the aperture you want (f8 for landscapes, f2.8 for portraits, etc) and the camera will automatically adjust the ISO (although you can control this part too) and shutter speed to get perfect exposure.
#5 Take Notes
Each night, after a hard day’s slog with your camera, take the time to jot down a few notes in a journal about the day’s events.
This will help when you come to add keywords and descriptions of the places, people and activities featured in your photos. Alternatively some cameras allow for small sound bites to be attributed to each image which is another way to reference your pictures.
#6 Scout Locations
If you find gaining inspiration of what to shoot difficult, start by taking a walk to the local tourist information center and ask the staff their where they recommend you visit.
Explain what style of travel photography you enjoy and ask whether there are any local guides or fellow photographers in the area who would be willing to show you some of the sights away from the tourist track.
Take a look at postcard stands to decide what areas or resorts appeal to you and read through guide books or search online before your trip to get an idea of what you want to achieve.
If you have the time prepare a ‘shot list’ to help focus your mind when you are on location.
Scour the internet for articles and blog posts to help get ideas for photos. Talk to friends who have been there. Reach out to other photographers. Become more knowledgeable about which images will capture the essence of a place.
Once you know the names of potential photo locations, do more research. Which time of day has the best light? How difficult is it to reach certain vantage points? What time does an attraction open, and when will tourist traffic be low? What will the weather be like?
Pinterest and Instagram can especially be a gold mine for beautiful photo locations since they are image heavy platforms. You can easily save your findings in both the platforms too!
#7 Ask People For Permission
One of the biggest stumbling blocks for any travel photographer is confidence. We’d all love to grab those beautiful environmental portraits – expressing the subject’s culture and character but many of us choose to fire of a telephoto shot from meters away for fear of rejection.
Asking people for permission to take their photo is polite and respectful.
If you have had a great encounter with someone, or you just see a great opportunity to capture a wonderful portrait, give them a big smile and ask if it’s ok to take their photo.
Sometimes you will get a yes, and sometimes you will get a no. But you won’t get a YES if you don’t at least try.
You don’t have to speak the same language to get permission. Simply make eye contact, smile, and point to your camera or say “photo?”. Most people will understand and will either nod or shake their head.
But what if you want to get a candid shot, with the subject looking natural? Well this can be a bit more difficult but there are ways to achieve this without annoying the person.
Don’t make it obvious that you are taking their photo. Try to act natural and as though you’re taking photos of many different things in the scene. You can also keep your camera down by your side and point the lens in their direction.
If you have a zoom lens, use it. This was you can be on the other side of the street or market and still photograph the person.
Another one of our favorite travel photography tips for portraits is to bring in another element to the shot. Most people will feel uncomfortable posing for a photo, but if you can make it about something else they will feel much more at ease. As an example, maybe ask if they can pose with something in their store like a rug, or ask them to show you their wedding ring.
This way they’ll realize there is more to your photo than just them. This will also add a lot more interesting elements to the shot!
#8 Be Safe
Most places in the world are relatively safe and the people friendly, but there are others where this may not be the case, so always take care to be conscious of your safety and take some sensible precautionary steps to reap better confidence in unfamiliar surroundings.
The first thing you should do after booking your trip is to take out adequate travel insurance for you and your gear and check the policy carefully to see what is covered – some adrenaline-orientated activities such as white water rafting or bungee jumping may be excluded for example.
Your homeowner or rental insurance might already cover you. If not, organizations like the Professional Photographers of America offer insurance to members.
Invest in solid luggage locks and anti-theft bags are great for travelling photographers.
Pocket a small amount of local currency in an easy-to-reach place and the rest of your cash elsewhere and keep a list of emergency numbers and phrases on your person.
Keep your gear secured when not shooting, like in a hotel safe or hostel locker. Try not to flash your camera around in sketchy or poverty-stricken areas, keep it hidden in a nondescript bag until ready for use.
Register new gear with the manufacturer. Copy down serial numbers and save purchase receipts to help speed up insurance claims. Include your name & camera serial number on image EXIF data, so if your camera is stolen, you can track it down online using StolenCameraFinder.com.
#9 Think Outside the Box
In choice tourist destinations it can be tricky ‘thinking outside of the box’ when there are so many cliché or timeless views of recognizable landmarks and sight-seeing subjects.
Shoot from the floor with a wide angle or fish eye lens, climb a tower and shoot from above, wait for dawn/dusk – mount your camera on a tripod and slow the shutter speed to capture the landmark in beautiful light whilst incorporate the ghostly movement of tourists strolling by.
#10 Use Your Shots Well After Your Trip
When your holiday has been and gone, consider what next to do with your images. If you’ve bagged some wonderful frames you could enter a choice selection in to a travel photography competition. Alternatively you could upload the files to an image stock site and harvest an extra revenue stream.
You could use these images as a basis for a portfolio to approach magazines, travel guides or tourism websites for work.
Finally you could even use the images to arrange a discount or free stay on your next trip. Simply contact the hotel manager and enquire whether they have a need for any promotional photos, which you could offer, for a free stay next time.
#11 Wake Up Early, Stay Out Late
Light is the most important ingredient for great photography – and soft, warm, morning light creates amazing images. Waking up early also means you’ll have to deal with fewer tourists and other photographers.
Want an epic postcard shot of a famous landmark like the ruins of Chichen Itza or the Taj Mahal? Just get there early right when it opens and you’ll pretty much have the place to yourself! Plus, you’ll avoid the harsh sunlight that usually starts to hit around late morning and early afternoon.
Sunsets are also great. The hour after sunrise and the hour before sunset are nicknamed “golden hours” because of their soft, warm tones and eye-pleasing shadows. “Blue hour”, is the hour after sunset (or before sunrise) when the sky is still blue, but city lights are turned on.
#12 Use The Rule Of Thirds
One of the most basic and classic of photography tips, understanding the Rule of Thirds will help you create more balanced compositions.
Imagine breaking an image down into thirds horizontally and vertically, so it’s split into different sections. The goal is to place important parts of the photo into those sections and help frame the overall image in a way that’s pleasing to the eye.
For example, placing a person along the left grid line rather than directly in the center. Or keeping your horizon on the bottom third, rather than splitting the image in half. Remember to keep that horizon straight too!
Composing using the Rule of Thirds is easily done by turning on your camera’s “grid” feature, which displays a rule of thirds grid directly on your LCD screen specifically for this purpose.
This well-known photography rule still holds true. When in doubt, make sure you’re using the rule of thirds to set up your photo.
#13 Experiment with Composition
Play around with the composition of your photo. Put the subject in the middle, on the side, at the top, etc. See what works with different angles!
You can almost always come up with a better photo composition after some experimentation. Maybe climb up something nearby and shoot from a higher angle. Along with different angles, try shooting from different distances too. Start with a wide shot, then a mid-range version, and finally, get up-close and personal. Never be satisfied with your first idea for an image!
Try to include powerful foreground, midground, and background elements too. If your subject is a mountain range – find a flower, river, animal, or interesting rock to include in the foreground. This gives images a 3-dimensional feel and helps convey scale, drawing a viewer’s eye into the rest of the photo.
#14 Make Time For Travel Photography
Attempting to take quick snapshots as you rush from one location to another will leave you with the same boring photos everyone else has. Make sure you plan “travel photography time” into your travel schedule. Good travel photography requires a solid time commitment on your part.
If you’re traveling with friends who aren’t into photography, it can be difficult to find the time necessary to create amazing images. You need to break off on your own for a few hours to make photography your priority.
#15 Don’t Underestimate the Human Element
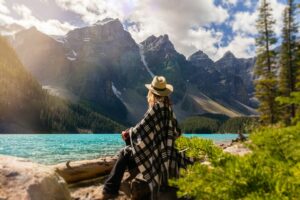
People like to live vicariously through human subjects in photos. Especially if the viewer can pretend the person in the photo is them. It adds more emotion to an image, you feel like you’re experiencing the location yourself.
The human element gives a better sense of scale. By placing your subject in the distance, you can get a better sense of just how big those mountains really are. It’s why photographing “tiny” people in large landscapes do so well.
Adding a human element to photos helps tell a story too. Images seem to be more powerful when people are included in them. You can completely change the storyline of a particular photo depending on what type of human element you decide to incorporate.
#16 Patience Is Everything
The key to capturing those unforgettable photos of popular landmarks, sites, or destinations is having patience. Travel photography is about really seeing what’s in front of you. Not just with your eyes, but with your heart & mind too. This requires dedicated time and attention. Slow down and make a conscious effort at becoming aware of your surroundings before pressing the shutter.
You can’t expect to show up at iconic spots like the Eifel Tower or Cinque Terre and get a perfect shot on your first try. You will need to be patient with the crowds and wait for people to pass by. And you’ll likely have to take several shots to get it just right.
Pay attention to details. Are the clouds in an eye-pleasing spot? If not, will they look better in 15 minutes? Sit at a photogenic street corner and wait for a photogenic subject to pass by. Then wait some more, because you might get an even better shot.
But if you don’t have the patience to try, you might miss a fantastic photo opportunity! Good travel photography takes time. The more patience you have, the better your travel photography will turn out in the long run.
#17 Always Bring A Camera
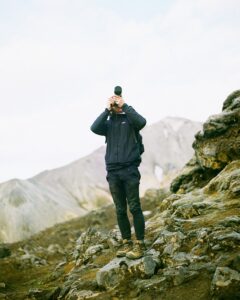
This may sound obvious, but you won’t get pictures if you leave your camera in your hotel room. Be ready for anything, and always carry some kind of travel camera around, because luck plays a pretty key role in travel photography.
The difference between an amateur photographer and a pro is that the pro is planning in advance for this luck, ready to take advantage of these special serendipitous moments that will happen from time to time.
You never know what kind of incredible photo opportunity might present itself while you’re traveling. Maybe while out walking you happen to stumble upon a brilliant pink sunset, a rare animal, or some random street performance.
Get a camera that you feel comfortable bringing with everywhere. Keep your camera on you, charged up, and ready for action at all times.
It doesn’t matter what camera experts recommend if you’re not going to feel comfortable bringing it along on your travels. Get a camera that makes sense for you.
#18 Backup Your Travel Photos
There’s not much that would ruin a trip faster than losing all your photos. Along with camera insurance, we can’t stress enough the importance of both physical and online backups of your travel photos.
Your memory card could get damaged, or your camera could be stolen. You might even accidentally delete your SD card and find yourself having to figure out how to recover your deleted photos.
The optimal travel photography backup workflow includes an external hard drive backup of RAW camera files, as well as online backup of select images and another online backup of final edited images.
For important projects, you can even mail a small hard drive loaded with images back to your home if the internet is just too slow for online backup of large RAW files or video.
#19 Get Better At Post Processing
Editing is where the magic really happens. There is a ridiculous myth out there that editing your photos using software is “cheating”. Let’s clear that up right now. All professional photographers edit their digital images. We use Photoshop and Lightroom, which you can rent for $13 per month. If you’re super serious, there’s really no competition. These products are the best.
Post-processing is an integral part of any travel photographer’s workflow. Just like darkroom adjustments are a part of a film photographer’s workflow. Learning how to process your images after they’re taken is FAR more important than what camera you use.
Learn how to improve contrast, sharpen image elements, soften color tones, reduce highlights, boost shadows, minimize sensor noise, and adjust exposure levels using the software.
#20 Don’t Obsess Over Camera Equipment
But if you went out right now and bought all that stuff, not only would it be super expensive, we guarantee it won’t improve your travel photography skills.
Why? Because the gear you use is not what makes a great photographer. Just like the type of brush a painter uses doesn’t make them a great painter. It’s knowledge, experience, and creativity that makes a great photographer.
Professionals use expensive gear because it allows them to produce a greater range of images. For example, extremely low light star photography. Or fast-action wildlife photography. Or because they want to sell large fine-art prints.
Instead of buying new equipment, spend time learning how to use your current camera’s settings. It’s a far better investment, and cheaper too!
#21 Never Stop Learning
Enroll in some online photography tutorials. Invest in a travel photography workshop. Go out and practice on a regular basis. This is how you get.
There’s always something new to learn. Invest in online courses and books about photography to improve your craft.
#22 Know Your Camera
You don’t need an expensive professional camera to take great travel photos. With advancements in smartphone technology, the cameras on our phones are taking better and better photos to the point where you sometimes can’t even tell the difference.
That being said, if you do have a great DSLR, Mirrorless, or Point and Shoot Camera, get to know it as best as you can.
#23 Fill The Frame And Use The Frame
Find unique ways to fill your photo (i.e. don’t have too much open space in the foreground if it’s not necessary) or create a frame for the subject that you are photographing. This can be done by taking a good look at the surroundings of your subject before you shoot. Look through your viewfinder and try to find some hidden gems that will make your picture stand out!
#24 Practice
As with any skill, the more you keep at it, the faster you’ll improve. Practice taking photos as much as you can! You’ll eventually start to learn and see what works vs. what doesn’t. And don’t get hard on yourself at first–the skill will develop the more you work on it!
#25 Put The Camera Down
This might be one of the most important tips on this list. Although this entire article is about how to take better travel photos, you need to remember to put the camera down once in a while to be present in the moment and really appreciate where you are.
You’re traveling to see and experience a place, so you should probably do exactly that! Put your camera down and be present to take in the moment.
#26 Make Smart Hotel Choices
Why make life difficult, travelling to scenic viewpoints, when you can shoot right from your window? If you’re flexible with your hotel choice and budget, it might not be a bad idea to pick one that is centrally located or one that has an awesome balcony/view! It’s a convenient way to be able to take some cool shots of the city.
#27 Move Your Feet
The iconic Taj Mahal photo doesn’t look as good if you’re a few steps to the left of having it perfectly centered.
This follows on from framing and composition. When you take a shot, try to frame it like you would want to see it on a wall. Sometimes standing exactly where you are is not always the best structure for your shot.
Move around until you are happy with the shot. Take a few steps forward, backwards and to the sides to get an idea of every possible angle.
Still take the photos, and that way when you are home and can see your photos on the computer and see which ones you like best.
#28 Be Unique
There’s nothing wrong with getting those iconic shots of the Eiffel Tower or Machu Picchu. They’re beautiful and are often amazing angles of famous places that everyone wants to visit.
But don’t forget to be unique as well! Find a different perspective that hasn’t been photographed a million times. In fact make it your goal to get a few unique shots that you can be proud of.
And despite the negative attitudes some people have towards them, it’s even possible to take awesome travel selfies which will add an artistic flair to your shots.
#29 Shoot In RAW
You might typically take photos in normal quality, but if you travel to a destination with an epic viewpoint, you may want to reconsider the quality in which you’re shooting.
When you take a photo on your digital camera, the computer chip inside it takes what you captured on the sensor and converts it into a format that can be easily read. For most cameras, these two formats are RAW and JPEG.
JPEG is a compressed format that the camera creates to save on space. In doing so it ‘locks in’ all the data that it picked up such as the color and white balance.
RAW files, actually saves all the data of what you took and doesn’t compress it. This means you can edit the photo and really play around with certain elements of the shot without damaging it.
Keep in mind that the file sizes will be a lot bigger so you’ll need to have extra storage.
Shooting in RAW really allows you to push the dynamic range of your photo but keep in mind that if you have no plans on editing your photos then shoot in JPEG.
#30 Tourist information offices
Tourist information offices employ local people who will have insider knowledge about the area.
#31 Take Better Candid Photos
There is nothing worse than cheesy posed pictures. Grab candid pictures when the subject is unaware that you’re photographing them for better results.
Try and get in close to your subject so they are recognizable: a common mistake is to have a person too small in the frame. Show off a beautiful location by having a person actively doing something within the scene, such as walking along a beach.
#32 Get White Balance Right
Have you ever taken a photo and the colors just look off? What’s most likely happening is the color temperature is affecting your picture. White balance settings will adjust the color temperature for any given lighting situation to correctly render elements that are supposed to be white – instead of grey or some other color.
Remember that, if you are shooting in raw, the image on the display is for viewing purposes only and can be changed post-processing; however, if you are shooting JPEG, the white balance setting will effect the file at the point of capture. The cloudy white balance setting is great for just warming up a scene a bit.
#33 Read Your Histograms
When reviewing images on your LCD, press the Info button to bring up your histogram. The left side of the graph indicates the shadow information and the right side the highlight information of the scene.
The idea is to make an exposure that puts the graph as far over to the right of the rectangle without going over the end – if it does, it means your highlights are blown out. When you’re in very bright, sunny conditions it’s impossible to see the image on the LCD, so use the histogram to check if your exposure is correct (find out How to read a histogram: free cheat sheet).
#34 Shoot Into The Sun
You may have been told to have the sun at your back to get perfectly exposed shots, but this will also result in flat and boring pictures! Shoot into the sun with a wide-angle lens and stop down to at least f/16 to create a natural sunburst for a dramatic image. Try placing the sun just peeking out from behind a tree or other interesting subjects.
#35 Use ND Filters For Long Exposures
Neutral density (ND) filters are great fun to use for various effects. They come in various densities to reduce the amount of light entering the lens, resulting in longer shutter speeds for interesting photographic effects.
In popular tourist locations, try using an ND filter combined with a long exposure to blur moving people into thin air! Anything that moves during the exposure will disappear. Use an ND for coastal scenes and the long exposure will blur the water to create a misty effect.
#36 Shoot Cities at Night
Cities come alive with lights and color at night, and distracting details such as cranes, wires and unsightly buildings melt away in the background. Every holiday destination will have something that looks great at night (read the 12 common errors of night photography – and how to fix them).
Good subjects include illuminated fountains, sculptures, churches or cathedrals, and market places. Use fountains or statues as foreground interest with the main subject in the background. Or juxtapose old architecture with new to give more depth and dimension to your images.
Night travel photography can be super fun, but it takes a while to get the techniques down. Have patience, and you will improve.
Also, it takes some thought and research. You can’t just expect to step outside on any night and get great night shots. You need to plan around the moon and the constellation paths and weather.
#37 Play With HDR
The HDR (High Dynamic Range) technique is perfect when you have a high-contrast scene. With your camera on a tripod, take several exposures for the shadows, midtones and highlights. Depending on the exposure range of the scene, three exposures with 2-stop increments works well and can be done by bracketing your shots.
Don’t overdo it by having too much detail in the shadows, which makes for a surreal image.
#38 Don’t Be Afraid of a Little Rain
 Cloudy days can sometimes be disappointing when you’re on vacation, but they often make for the most interesting photos. Clouds soften the sun’s light, acting like a natural light box, and make it possible for you to get great shots even in the peak of the afternoon.
They can also create a cool, moody effect and can make your pictures more interesting than if you have a clear blue sky.
Try these ideas to get a fun, rainy day shot:
- Waterfalls!. Not only because there’s plenty of water, but the overcast conditions provide soft, even light for a low-contrast image.
- Woodlands come alive with color under overcast conditions, as direct sunshine tends to be too high-contrast/distracting.
- Head indoors – interiors of cathedrals, museums or even shopping malls always have something of interest to shoot on a rainy day.
- Gardens look good in overcast light and the rain will make the foliage glisten and come alive.
- Close-ups of nature are great anytime, but especially in wet conditions as more creatures come out, plus the overcast light brings out every detail in the subject.
- Take a photo of people walking in the street with colorful umbrellas.
Tip: If you do take your camera out on a rainy day, be sure to carry with you some protection so it doesn’t get ruined. A dry bag packs up small and can keep your camera and all other valuables dry even in the heaviest downpour.
#39 Make a Picturesque Panorama
When you come across a scenic viewpoint, instead of using a wide-angle lens so that everything appears small, try shooting several images and stitching them together in Photoshop.
This works best if you are using a tripod and allow at least a third overlap of each image so there is enough information to stitch the images together. Focal lengths of 50mm or longer are best. Use manual focus and manual mode so that all of the exposures are consistent.
#40 Photography List
Make a list of photographs you wish to achieve during your trip. This will give each day clear direction and structure. Use websites such as suncalc to see where the sun will be in relation to your subject. Visit websites like 500px and use their search tools. Search the destination you wish to visit, and gather some inspiration from the photos that come up.
#41 Local Photographers
Reaching out to local photographers can be a great way to learn about your destination. If you’re lucky they may share some of their favorite photography locations. The expectation is you reciprocate if a photographer reaches out to you in your neighborhood.
#42 Set Your Camera To Shoot In Burst Mode
Setting your camera to “burst” mode means that several shots will be taken with a single click of the shutter. This is especially helpful when you’re trying to take an action shot, like a whale breaching the water’s surface.
Also, burst mode is a good idea when handing your camera to a stranger to take your photo. You will get several to choose from, instead of just one where you’re blinking and someone is photo-bombing in the background.
#43 Take Shots Of The Little Things Too
Sometimes when we travel, we get so caught up in the big viewpoints and famous landmarks, that we return from a trip with only photos in front of tourist attractions.
Often times though, the photos of the “small moments” are just as good, and perhaps even more memorable, than the shots we plan out.
Remember, not every photo has to be frame-worthy. And sometimes you’ll find your favorite shots are the unexpected ones because they sum up your trip in a way the “perfect” shots just can’t.
#44 Capture Movement
Sometimes we avoid movement because it can look messy. But movement can give your pictures life.
Think about it: a photograph of a New York City with no people in it won’t give the same feeling or dynamic as one with a crowded street with people moving. The second picture emanates the buzz of the city and helps the viewer really understand what NYC is like.
Try to capture birds in flight. Kids playing in a park. The wind blowing trees. Breathe some life into your travel photos.
#45 Get In Your Shots
Sometimes it is more comfortable to be behind the camera than in front of it, don’t be afraid to be a model too. Stepping into your pictures can create some really interesting shots.
This is easiest if you have a travel companion or a tripod, or stumble upon a camera-savvy stranger.
#46 Think About What You’re Wearing
When you’re headed somewhere that you’ll want a photo in front of, avoid shirts with writing, and stay away from super busy patterns and anything too “trendy”. Also, choose colors that are neither dull nor super bright; and avoid shirts that will show sweat stains.
Putting a little bit of thought into your clothing choices can make your photos much better, and will save you embarrassment down the road.
#47 Don’t Overthink It
This might sound contradictory after just piling up a list of tips and things to think about when taking photos. But the thing is, even if you’re a pro, you can’t do all of these things each time you snap a picture.
And sometimes you only have a moment or two to capture a shot. Go for it. Spontaneity is beautiful. If you have time, look at your picture and think about how you could make it better and snap another.